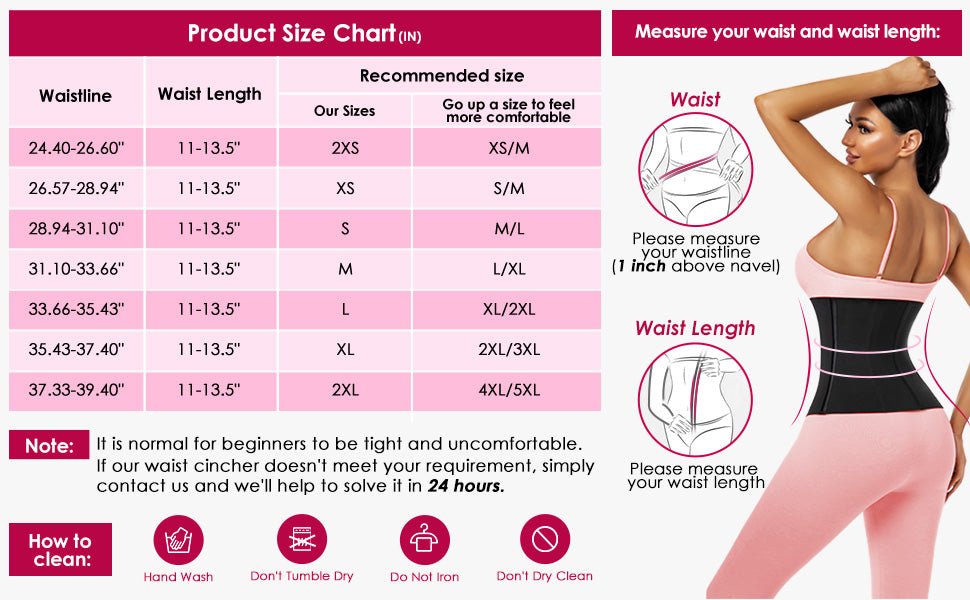
Hey ladies, it's time to redefine your curves and boost your confidence with a waist trainer! But hold on, before you embark on this fabulous journey, you need to make sure you've got the right fit.
Finding the perfect waist trainer size is easier than you might think, and we've got a step-by-step guide to help you measure your waistline accurately.
So, let's get started on this empowering quest to your ideal waist trainer size!
Step 1: Gather Your Tools, before you begin grab a few essential tools. You'll need a soft, flexible measuring tape (the kind that won't give you any surprises), a mirror to ensure accuracy, and a notepad and pen to jot down your measurements.
Step 2: Dress for Success, to get accurate measurements, opt for snug-fitting clothing or even better, just your undergarments. You want your measurements to reflect your true natural curves and contours, not any extra fabric getting in the way.
Step 3: Stand Tall and Proud, stand in front of a mirror with your feet shoulder-width apart, maintaining a relaxed but straight posture. Confidence is your best accessory, and it helps ensure accurate measurements. You'll get more accurate measurements when you're not slouching.
Step 4: Locate Your Natural Waist, your natural waist is the most crucial point for measuring your waist trainer size. Locate your natural waist, which is the narrowest part of your midsection. Think of it as your body's built-in corset line. Find it by gently bending to the side – the crease that forms is where your natural waist resides.
Step 5: Wrap the Tape, wrap the measuring tape snugly around your natural waist, ensuring it's parallel to the floor. The tape should be snug but not so tight that it's uncomfortable. You should be able to slide a finger underneath without too much difficulty.
Step 6: Inhale and Exhale, while the tape is in place remember to breathe naturally. Inhale and exhale as you would in your everyday life. This ensures that your waist trainer won't be too tight and constricting when you wear it.
Step 7: Record Your Measurements, after obtaining the measurement write it down in your trusty notepad. This is an important step in the process, and having a written record will be handy when you're shopping for your waist trainer. It's essential to have an accurate record of your waist measurement for future reference.
Step 8: Triple Check For extra precision, take three measurements: one while standing, one while sitting, and one while lying down. Averaging these measurements will give you the most accurate waist size. Remember, it's all about accuracy!
Step 9: Calculate the Average, to find your final waist measurement, calculate the average of the three measurements. This is the magic number that will guide you in choosing the perfect waist trainer size.
Step 10: Consult the Sizing Chart, now that you have your waist measurements, it's time to consult the sizing chart of Curves-O-Matic waist trainer. Keep in mind that different brands might have slightly different sizing recommendations, so make sure you follow their guidelines to make the right choice.
Ladies, you're now equipped with the knowledge to measure your waist accurately and find your ideal waist trainer size. Remember, waist trainers should enhance your natural curves and provide a comfortable fit. Don't be too hard on yourself – our bodies are unique and beautiful just the way they are, whether you're aiming for an hourglass figure or just a little extra support, a well-fitting waist trainer can be your secret weapon.
So, go out there, rock that waist trainer, and show the world the confident, empowered woman you are!

